Disney Count Down to Halloween

I've always gotten a kick out of advent cards (especially the ones with chocolates or little ornaments inside each day) and I'm passing along the tradition to my little girl.

Now you make your very own count down to Halloween with Mickey & Friends! Celebrate 13 thrilling days to October 31st. Download the free template from Disney Family HERE

Homemade Halloween Decor

Chloe created this on the Paint program on my computer the other day. I transferred the picture to a Word Document and we added the text. I printed it on glossy photo paper, and placed it in a $3 frame from Walmart. I'm so excited for her to do this for all the holidays and seasons. I think this would also make a great fundraising or project/gift idea for a classroom.


sig2

Sunday Brunch

       
This week we decided to start out our day of football fun with a brunch!
Just something a little different from our typical football menu!

Menu
Bagels & cream cheese
Sausage  Casserole
Fruit
Cake Doughnuts
Mimosas
Screwdrivers
Chocolate milk
Orange Juice


There were 14 of us, 8 kids and 6 adults. We ate all the casserole and doughnuts, so I think it was a perfect amount. I've been wanting to make these doughnuts for a while now. I had two different recipes. A Wilton recipe from the donut pan itself and one from Family Circle magazine. I tried the vanilla Wilton recipe and the Chocolate FC recipe. I preferred the FC recipe for reasons of taste &  ingredients. I felt the Wilton doughnuts were too dry and I didn't like that they called for cake flour as opposed to all-purpose flour. Here, I will include the recipe of the winner of this Good Things Simple doughnut war. Drumroll please....


  The winner is....


Family Circle's Chocolate Cake Doughnuts!

Here's the recipe:
1 c. all-purpose flour
3/4 c. unsweetened cocoa powder
1/2 teas. baking soda
1/4 teas. salt
1/2 c. low-fat buttermilk
1/2 c. packed dark brown sugar
1 egg
4 teas. unsalted butter, melted
1 teas. vanilla extract

Heat oven to 325 degrees. Coat doughnut pan with nonstick cooking spray. In a large bowl, whisk flour, cocoa, baking soda, and salt. In a separate bowl whisk buttermilk, sugar, egg, butter, and vanilla until smooth. Add milk mixture to flour mixture; whisk until blended and smooth. Spoon batter into a large resealable plastic bag. Cut off the corner and squeeze batter into prepared indents, about 2/3 the way full.  Smooth tops. Bake for 13 minutes, until doughnuts spring back when lightly pressed. Cool in pan on rack for 3 minutes, then carefully turn out directly onto rack to cool.

Chocolate Glaze:
In a bowl combine 1 c. powdered sugar, 1 tbls. unsweetened cocoa powder and 2 tbls. milk. Stir until smooth. Dip cooled doughnuts into bowl and allow excess frosting to drip back into the bowl. Add toppings or sprinkles at this point. Allow to chocolate glaze to set.


Christmas Morning Breakfast Casserole


2 pkgs. Farmer John (breakfast) Sausage Links (found near the bacon)
3 c. Ore-Ida frozen shredded potatoes
1 medium green bell pepper, chopped
1/4 c. butter, melted
12 oz. cheddar cheese, shredded
1/2 c. onion, finely chopped
1 (16 oz.) tub small curd cottage cheese
8 lg. eggs
1 tsp. sage (optional)
Salt and Pepper to taste

Preheat oven to 375 degrees. Lightly grease 13x9 inch baking dish. Place the sausage, onion, and bell pepper in a medium skillet and cook (while crumbling the sausage) over medium heat. Drain, set aside.

In the baking dish, add the potatoes and melted butter, stir to combine as best as you can. Press the potatoes evenly to line the baking dish. Bake for 30 minutes. This is your "crust."

Meanwhile, mix the sausage, onions, peppers, cheese, cottage cheese, spices, and eggs in a large bowl. Pour it over the baked potato mixture.

Return to oven and bake for 40 minutes. Allow to cool 5 minutes before cutting.

Total cooking time is 1 hour 10 minutes. Serves 12.
We eat this often, but always on Christmas morning, hence the name!

  
 sig2

Ghost Leaves Kids Craft

Boo! Say hello to our new ghost friend created with leaves. Cute huh! Want to make some with your little gobblins? Super easy & so much fun. Let's get started.

You'll need white paint, brush, wiggly eyes, glue and silk leaves (we used small & large sizes).

Paint both sides with the white paint. Let dry & glue on the eyes.
That's it! Super fun Halloween decorations your kids will love to show off!

Love how the ends of the leaves started to fray. Adds to the spookiness!


She's so proud! We hung the big guys in our front window and made a garland with the little ones for her room.

Hope you'll try making a few to add to your Halloween decor!
Thanks for stopping by!

I'm linking to these fabulous blog parties!

Playdate Invitation

This year we decided to put Chloe in the school near our house. While she knew a few of the kids from playing Little League with them, she didn't know any kids well enough to have a playdate. I don't know any of the parents, so she won't be having any playdates at their houses! Not all the parents show up during morning drop-off or afternoon pick-up so it has been impossible for introductions or arrangements. So I turned to the age-old INVITATION!

Remember, I like good things and I like them simple. So I wanted something cute that would make an impression but I didn't have a lot of time. I don't have any fancy shmancy software either. So I created a simple invitation in Microsoft Word.


1. Open a new word document.
2. Click Insert
3. Insert Clipart
4. Type "vine" in the search box in the clipart window. Choose the background.
5. Stretch the picture over 1/2 the page of your word document.
6. In "format" tab click on the "text wrapping" icon, then check the "behind text" option.
7. Choose a cute font and start typing.
8. At this point I made another one on the bottom half of the page, but this is optional.
9. Print on white cardstock.
10. Cut and trim your invitation and hole punch two holes 1" apart on the top.
11. Thread your choice of ribbon through and tie in knots as close to the paper as possible so the ribbon doesn't slip through.
12. I added a 3D cupcake sticker.

 I let her take one invitation to school today and she gave it to her friend.
The friend saw me after school today and was very excited!

P.S. No need to try and call me or come over,
I changed the address and phone number for the purpose of this post! :-) 


sig2

Light Bulb Terrariums

How genius is the idea of using light bulbs as miniature terrariums? What a fun DIY project. They make wonderful place cards for your next party (and they double as favors too)!


What you'll need:
  • Light bulbs (globe, incandescent, clear)
  • Tillandsias (also known as air plants)
  • Dry moss
  • Spray paint
  • Self adhesive silicone bumpers
  • Place cards (with care instructions printed on opposite side)
  • Metal wire

Instructions:
  • Hollow out light bulbs (make sure to wear safety goggles). Great tutorial here
  • Spray paint the cap of the light bulb for a cleaner look
  • Use Tillandsias & moss to fill the terrariums
  • Attach silicone bumpers on the bottom for stability
  • Hole punch place card & secure with metal wire
{Photo credit: Dream Box Photography}

Bunting Cake

Next time you make a cake, add some whimsy & fun with bunting!

Sure to make you smile!

Photos via Rosy Posy

Good Things Simple-Snacks

Nutella

Today lavender Clouds is featuring it's first "Good Things Simple" Snack Idea. With all the things we have going on it's always great to have delicious and simple snack ideas.
Our house loves Nutella. Since she despises peanut butter, Chloe ate a nutella and wheat bread sandwich everyday at school for an entire year! She was the envy of all the little children who also wanted chocolate sandwiches for lunch! Today I wanted a sweet and savory snack and in 2 minutes I was in chocolate hazelnut bliss!


Spread Nutella on toasty, warm sourdough.


I couldn't even wait to take a bite before I snapped a picture!

GOOD THINGS SIMPLE!

Here's a variation: Make a Nutella panini! Spread the outer sides of your plain sourdough with butter, the inside with Nutella, put them together, butter side out, and grill on your panini. Cut it in half, sprikle with some powdered sugar, and you now have a Good Things Simple dessert!

Do you have a good and simple snack idea? If so, I'd love to hear it.
                                                               
  
sig2

Birdcage Candy Wrapper Printables

What a lovely way to dress up chocolate bars! Visit Nonpareil Magazine to download these FREE bird cage candy wrappers from Posh Pixels Design Studio. Get them HERE

How To Hem Your Jeans

How To Hem Your Jeans


The other day I purchased a fabulous pair of Seven For All Mankind jeans at Costco of all places!
However, they, like always were much too long. I don't like sending my jeans out to be altered because it always seems like they're not the length I wanted when I get them back. So, like I do whenever I need to learn something I turn to YouTube! I found a great video, and have been using this method on my families jeans. Here is the tutorial in pictures:
Supplies:
Fabric Scissors, pins, thread and bobbin in your choice of color, ruler, white fabric pencil, and sewing machine.
Instructions:
 1. Try on your jeans WITH the shoes you will most often wear with them.
Heels vs. Flats.

2. Pin the jeans where you want the finished length to be.
Take them off :-)

3. Measure the length evenly and using a ruler, mark a white line.

4. NOW, using the ruler, measure 1 inch below that white line you just drew.
You now have two white lines.

5. Now, with scissors cut on the white line that is on the bottom.
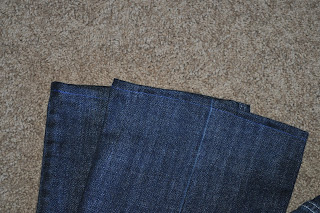
After you cut it should look like this:


6. Now cut the four inside seams about 1 half inch, like this:


7. Now fold the bottoms up a half an inch, like this:


8. Fold them again a half an inch, using your white line as a guide. The white line should be at the very edge of the bottom hem, adjacent to the floor. Like this:


Here's what it will look like inside:


9. Don't forget this step! Try them on again, carefully, because of the pins! Look carefully at the length of both legs and make any necessary adjustments by re-pinning.


10. Is your machine ready, because you are! Take off your jeans again. Sew them from the inside of the cuff, removing the pins along the way. Don't forget to backstitch a few, so they don't unravel.


Wha la! Once you've done both legs your done! Easy!


I'm so grateful Laura put this tutorial on YouTube, Thanks Laura!

The link to Laura's YouTube video:


sig2

Short Ribs Braised in Red Wine (14 of 120+)


Short Ribs Braised in Red Wine
Such a great winter slow-cooker meal that can be made ahead of time. My interpretation of a Williams Sonoma recipe.
  • 3 lb. beef short ribs
  • Salt and freshly ground pepper, to taste
  • ½ cup flour
  • 5 pieces bacon, small dice
  • 2 Tbs. olive oil
  • 1 yellow onion, diced
  • 1 carrot, peeled and diced
  • 2 celery stalks, diced
  • 3 garlic cloves, chopped
  • 1½ Tbs. tomato paste
  • 1 bottle Full-bodied red wine
  • 2 Tbs. beef base
  • 1 fresh rosemary sprig
  • 1-inch piece Parmigiano-Reggiano cheese rind
Generously season the short ribs with
S & P. Dredge the ribs in flour and shake off the excess.
In the stovetop-safe insert of a slow cooker over medium-high heat, cook the bacon until crispy, 3 to 5 minutes. Transfer to a paper towel-lined plate.
Working in batches, add the ribs to the insert and brown on all sides, about 10 minutes total. Transfer to a plate.
Pour off the fat from the insert. Set the insert over medium heat and warm the olive oil. Add the onion, carrot and celery and sauté until soft, about 10 minutes. Add the garlic and tomato paste and cook for about 1 minute. Add 1 cup of the wine and stir to scrape up the browned bits. Add the remaining wine and the beef base and bring to a simmer. Add the short ribs, rosemary and cheese rind. Set the insert on the slow-cooker base. Cover and cook on high for 4 hours, stirring occasionally.
Skim the fat off the cooking liquid, and discard the rosemary and cheese rind. Transfer the ribs to a serving bowl and cover with aluminum foil. Pass the vegetables and cooking liquid through a food mill into a fry pan. Simmer over medium heat until reduced by one-third, about 10 minutes. Adjust the seasonings with salt.
Serve the ribs and sauce over mashed potatoes and garnish with bacon bits & fresh grated parmesan.
photo courtesy of Williams Sonoma

CPK Chicken Milanese (13 of 120+)

CPK Chicken Milanese

A revised version of a CPK menu item from Lizzy's time working there.

Panko & Parmesan crusted Chicken

  • 4 chicken breasts
  • 2½ cups panko
  • ¾ cup flour
  • 4 eggs, lightly beaten
  • ½ cup parmesan cheese
  • salt
  • pepper
  • 1 cup Olive oil

Arugula Salad

  • 4-5 cups Arugula
  • 1-2 Lemons
  • 4 Tbs Parmesan cheese, shaved
  • Pepper
  • 2 Tbs Premium Olive Oil
  • this quantity serves 2 or 3

Set up standard breading station flour, egg, panko. Make sure to season each section with salt and pepper. Also, split the ½ cup parmesan equally between the flour and panko areas.

Preheat the olive oil in a large sauté pan on a medium heat.

Slice chicken lengthwise super thin and pound thinner if necessary.

Bread the chicken and start pan frying in batches. Chicken takes 5 minutes or so per side and should only be turned when it's a nice dark golden brown. Adjust heat if necessary. Remove chicken from oil let rest on a rack. Season with salt.

Serve with Arugula Salad on top while chicken is still slightly warm. Dress the salad in each bowl/dish so that the chicken gets some of the lemon juice and other ingredients.

Buddha Pears

Something magical happened when a clever Chinese farmer took a very Zen approach to growing ordinary fruit. He created tiny praying Buddhas out of pears by encasing the young pears in molds while they're still on the tree. As they grow they have no choice but to take the shape of the figure.

I bet it is amazing to see an orchid of pear trees growing hundreds of tiny Buddhas but I don't know if I could actually eat one. It's kinda like a piece of art and really, are you suppose to eat a Buddha?

Breakfast time! Recipes 9-12

Growing up, and even in our house now, breakfast is a big deal, especially on the weekends. Over the years the importance of meal times has slowly disappeared. Not only do we not have time to sit down and eat, but we sure as heck don't have time in the hustle and bustle in the mornings. These recipes are classics that will never get old, no matter how old you are or how busy your life has become. I grew up eating all of them often enough for them to become family favorites.

Surprise Muffins: Growing up my mom Kitty made these as a side dish to none other than Oriental Chicken Salad. Sounds weird but they actually go quite well. Because I was such a picky eater my mom always made me plain ones, but made the jam & jelly filled ones for my sisters and dad. I remember making the jelly filled ones for Scott the first time and watching them disappear before my eyes. Over the last year or so I have tweaked the recipe to have a little more milk, for moisture, and less flour. I have also gotten in the habit of adding only chocolate chips to the batter herein creating a Chocolate Chip muffin recipe that's AMAZING. Be careful when making this recipe, a second batch could be in the works without you even knowing it!

Pancakes: I, like most of the entire world, has grown up eating pancakes one of two ways: from a mix (bisquick or krusteaz) or at a restaurant. Little did I know that pancakes from scratch or easier, better for you, and tastier. There's a lot to be said about knowing what you're putting in your body, so less packaging the better. This recipe is delicious and tastes just like the ones my grandpa made me as a kid (even if they were from a mix).

Waffles: Aren't waffles the ultimate weekend breakfast food? Even after growing tired of the beloved Eggo waffle I still love a great waffle. I guess that's why I got married, teehee! For the waffle-iron! How on earth was I ever going to buy MYSELF a waffle-iron?! I have recently become somewhat of a waffle aficionado when dining out. All about town I am constantly ordering waffles, I LOVE them!

Puff Pancake: Besides the waffle the puff pancake is by far my favorite homemade breakfast item. This is so unique because you can't get a pancake like this anywhere else except for home. The ultimate version of this recipe is with fresh seasonal fruit (apples were a fave in our house) & the use of a cast iron skillet. Believe me, this recipe will succeed without them. Don't you want to have the tastiest most ultimate version of the puff pancake?!

Puff Pancake (12 of 120+)


Puff Pancake
Perfect for a weekend breakfast treat, especially with a crowd. Yummy!
  • 2 Tbsp. butter
  • 1 cup of flour
  • 1 Tbsp. sugar
  • 1/2 tsp. salt
  • 1 1/4 cups milk
  • 2 eggs
  • dash cinnamon
  • 1 apple (optional)
Preheat oven to 375
Melt butter until sizzling in a 10 inch oven-proof skillet. Combine dry ingredients in a bowl. Slowly add eggs and milk. Finish with a dash of cinnamon and chopped apples (optional). Pour batter into the hot skillet and bake for 35 minutes until golden brown.
Serve with butter and syrup.

Waffles (11 of 120+)


Waffles
Another good old fashioned breakfast recipe that was a favorite in the Resch household.
  • 1½ cups flour
  • 3 tsp. baking powder
  • 2 tsp. sugar
  • ½ tsp. salt
  • 2 eggs
  • 1 cup milk
  • 3 Tbsp. butter (melted)
  • dash of cinnamon
Preheat waffle iron.
In two separate bowls mix the dry ingredients and whisk the eggs & milk in the other.
Combine the two and add the melted butter at the very end, making sure not to overmix.
Cook in a greased or nonstick waffle iron until done. Serve with butter and syrup.

Pancakes (10 of 120+)


Pancakes
This is a simple old fashioned pancake recipe. So delish!
  • 2 cups flour
  • 2 1/2 tsp. baking powder
  • 3 Tbsp. sugar
  • 1/2 tsp. salt
  • 2 eggs
  • 1 1/2 cups milk
  • 2 Tbsp. butter (melted)
Sift the dry ingredients into medium sized bowl.
In a smaller separate bowl whisk the eggs and milk.
Combine the wet and the dry ingredients and add the melted butter at the very end.
Cook on griddle to desired size and doneness.
Butter each side of the pancakes immediately after coming off of the griddle.
Serve with syrup or jam.

NYC Through Her Eyes

 New York City Through the Eyes
 of an 8-year Old


This summer my husband and I took our two children on a two-week east coast vacation.
We spent three night in NYC, seeing the sights.


After taking hundreds of photo's with my Nikon D5000, I forgot it in the Airport
bathroom on our way home.


We had photo's with family and friends in NYC, New Jersey, and North Carolina.
It was a devestating loss.


We spent two exhausting days in a desperate search for the camera's.


My husbands camera was also in the camera bag along with mine.


I hadn't downloaded or printed any of the photos from the camera's.


Luckily,


My 8 year-old daughter had taken her camera on the trip with us.


These are the photos SHE took.


We are so grateful, that she was able to capture some memories from our trip.


We were delighted with the beauty she saw and captured.


It was sad to have lost the camera's, to know that someone found it and chose not to return it. It gave us an uneasy feeling to know that some stranger was looking at us, at our photos. But...we found comfort in the fact that we DID have a perfect trip, and we all made it home safely.

I will cherish these photos my young daughter took forever. Actually, I'm considering making these photo's into postcards and using them as our Christmas Cards.

I now have 3 labels on my camera with reward information. Before it only had our phone number.

We gave our daughter a small pink digital camera for Christmas when she was 7.
She has given us a bigger gift.

Do you have a child who has taken an amazing or funny photo? Send them to me and if you "follow me" I will try and post it.

sig2
                                         
*The photos in this post are the property of Lilianna Grace
and cannot be used without permission.*