Reversible Fabric Bowl


I have so many craft projects going on, this bowl from Imagine Fabric would be perfect (and much cuter than my tupperware) to hold all my little pieces! Imagine Joel Dewberry or Amy Butler fabrics... Bliss in a bowl! Go to the tutorial

Stop and Smell The Flowers!


MmmCrafts has this shabby chic flower card tutorial. A great idea for those scraps of fabric and paper that I've been saving for the "perfect" project. How fab would these look framed on a wall? Go to the tutorial

Shoe Bag Tutorial

I ran across this fabulous D.I.Y Shoe Bag Tutorial. I filed it away as a "project I must do within the somewhat near future (like as soon as I learn how to sew)." The possibilities are endless - aside from shoes, think of all the fun things to store in these! I'm thinking some fun and funky vintage fabrics to hold small toys & trinkets.

DIY Bridal Party Survival Kit

survival1

Ohhh I can't wait for someone to get married! What a lovely & thoughtful lil gift to pass out to bridesmaids (heck I want to make one for the groomsmen too!) The very talented ladies over at 100 Layer Cake created this template. Gorgeous, simple, practical and yup, f-r-e-e!

Allergy season has never been so stylish!


The husband suffers from year round allergies so we always have tissue in every room! The cardboard boxes are so ugly and never seem to match our decor. This stylish tissue box cover from Make It and Love It fixes all that! Go to the tutorial.

Eco Chic


Can you guess what this chic & innovative hurricane cover is made from?

Paper towel tubes!

I found this adorable idea at A Little Hut.
All you need is:
- 2 paper towel cardboard tubes
- scissors
- glue
- two letter-sized sheets of office paper
- tape
- 4.5" x 9" (11.4cm x 23cm) glass hurricane

1. Press and crease the cardboard tubes lengthwise. Cut the cardboard into 1/8" (4mm) slices. You will need 84 rings.


2. Arrange the rings in a pattern where there are alternating rows of 4 and 3 rings.


3. Attach the rings, by placing small dots of glue (shown in red) on the four outer sides of each ring that are adjacent to four additional rings. Only add glue to two points (shown in green) on the outer side of the rings used for the top and bottom rows of the cover.


4. Cut about 1" (2.5cm) off the short end of each of the sheets or enough to make them flush to the height of the rings. Tape the two sheets together along the long sides and secure them around the hurricane.
5. Once the attached rings are completely dry attach the opposite columns of rings to form a tube. Allow more drying time and hold with a paper clip or something similar while it dries.
6. Slide the tube of rings over the paper-covered hurricane.


Queer Animal Kingdom

Had to share this. I thought it was so awesome, innovative and creative. A perfect way to make a statement.

Nicole Georges 5/1/09 from cat on Vimeo.


Loving Zebra Print by Nicole J. Georges

http://spinstersummer.etsy.com

Support American Heart Association

Etsy Angels support the American Heart Association during month of May. These are some of the shops that are donation a percentage of their proceeds to the American Heart Association. Help support a wonderful cause plus receive super adorable stuff!

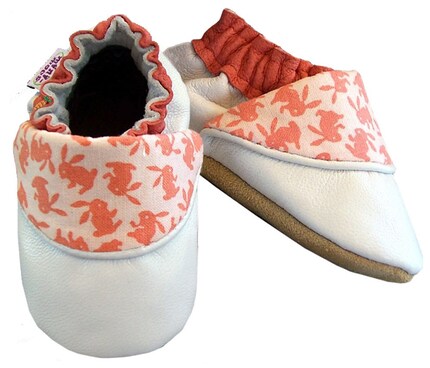
Myminimoc's adorable hip hop - - 4 Sizes Infant to Toddler - Soft Sole Baby Shoes - Genuine Leather Shoes. 10% of all of Myminimoc's proceeds from May sales will go towards the American Heart Association. Please check it out and help support a wonderful cause!!

Peaceful Kingdom - Limited Edition Fine Art Print - Art for Children
By NovusArt would be so perfect in a child's room or a nursery. Plus NovusArt will be donating 35% of ALL proceeds from May Sales to the American ♥ Association. Check it out and support a wonderful cause!


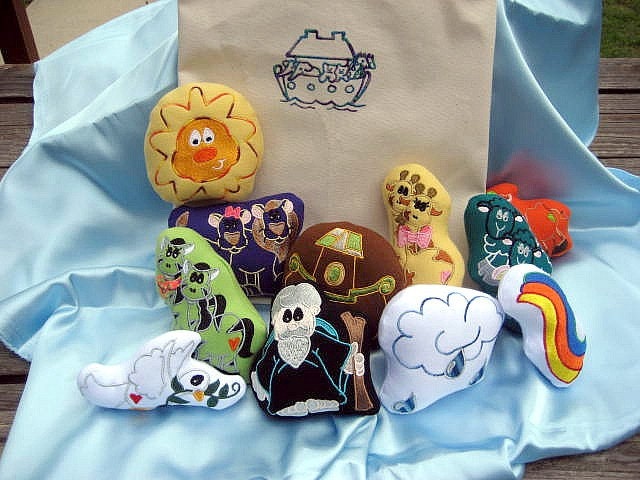
Noah's Ark Playset for Toddlers...
By Ozarknana's shop is so incrediably adorable. This would make a great gift for any toddler even made from organic bamboo fabric. Ozarknana will be donating 50% of each Etsy Angel's, Prim Kitty, Kitty for the American Heart Association and 10% of everything else in her shop Support the cause and get something adorable in the process!

Old school baby tricks and comfortable baby sling


How to carry your baby African style - More DIY How To Projects

I am currently working on making some baby slings and I saw this on instructables and thought it was great. I was also watching a movie series the other day called Into the West.. I'm not a huge western fan but really enjoyed it. One of the Indian women was carrying her baby in a basket type thing on her back, similar to an odd version of a backpack.
It looked super comfortable so I am going to try to figure out how to make one. We'll see, I might bring back really old school, eco-friendly baby backpacks!!

Another old indian trick- swaddling! Here is a good tutorial of how to use a simple baby blanket. I am also going to be coming out with easy velcro swaddling blankets soon!!


Help Your Baby To Sleep .......... - Funny bloopers R us

Sew behind... posting a ton of new things in my shop!!


I was super busy with the Sacramento Indie Craft Fair and now it is over and realized how far behind I am on EVERYTHING. I made a ton of new things for the craft fair but didn't sell very much because it ended up pouring almost the whole day. I was super proud of myself and all the vendors that showed up and still set everything up. There was actually a fair amount of foot traffic even for a VERY rainy day. I had some AMAZING help from some wonderful friends. I could not have done it without them. In the next couple of days I will be posting many more blogs (lost touch with you guys since April 10)... which i cant believe, I will put up a lot more items in my etsy shop and will share a couple of things I have been working on. I have also be trying to stay healthy as well. This month is Lyme Disease awareness month and I will be posting a lot of new and items on Lyme Disease. It is so horrible that so many people dont know about it and myself and so many people suffer terribly on a daily basis because of it. Well... I need to head to bed in order to get all of this stuff done tomorrow and the next day and the next...
Matt, my fiance is coming home soon! Hopefully on Sunday or Monday evening. He has been in Southern California for a month playing war games for the Army. I can't wait to see him. I have missed him so much. Also, when he gets home we have to start wedding planning!! May 29th, 2010!! Since it is Memorial Day Weekend everything will book up really fast. ok, ok.. off to bed. Good Night.

coolest video ever!

This blows my mind...

carrot cake cookies


These look so amazing. I am going to try and make these this week! thanks martha stewart!!


From:

Everyday Food
Send Me a Free

Preview Issue Now!

Before being filled, the cookies can be kept in an airtight container at room temperature for up to 3 days. The filling can be made ahead and chilled for up to 5 days.

Prep: 30 minutes

Total: 1 hour 15 minutes

Ingredients

Makes 18

  • FOR THE FILLING:
  • 2 ounces bar cream cheese, room temperature
  • 2 ounces unsalted butter, room temperature
  • 1/4 cup confectioners' sugar
  • 1 teaspoon fresh lemon juice
  • FOR THE COOKIES:
  • 1/2 cup (1 stick) unsalted butter, melted
  • 1/2 cup packed light-brown sugar
  • 1/4 cup granulated sugar
  • 1 large egg yolk
  • 3/4 cup all-purpose flour
  • 1 teaspoon ground ginger
  • 1/2 teaspoon salt
  • 1 cup rolled oats
  • 3/4 cup packed, finely grated, peeled carrots
  • 1/3 cup dried currants

Directions

  1. Preheat oven to 350 degrees. Line two baking sheets with parchment paper. Make filling: With an electric mixer, beat cream cheese and butter until smooth. Add sugar and lemon juice; beat until combined. Cover; chill until firm, at least 30 minutes.
  2. Meanwhile, make cookies: In a large bowl, whisk together butter, sugars, and egg yolk. In a medium bowl, whisk together flour, ginger, and salt. Add flour mixture to butter mixture; stir until combined. Mix in oats, carrots, and currants.
  3. Drop dough by level tablespoons, 2 inches apart, onto prepared baking sheets. Flatten with the palm of your hand. Bake until edges are crisp, rotating baking sheets halfway through, 15 to 18 minutes. Transfer cookies to a wire rack to cool.
  4. Turn half the cookies over, bottom side up; dollop each with about 1 teaspoon chilled cream-cheese filling. Top with remaining cookies, pressing gently to spread filling to edges. Serve immediately.